Git局域网搭建并自动部署
mkdir sampleproject.git |
### format的语法
replacement_field ::= "{" [field_name] ["!" conversion] [":" format_spec] "}"
field_name ::= arg_name ("." attribute_name | "[" element_index "]")*
arg_name ::= [identifier | integer]
attribute_name ::= identifier
element_index ::= integer | index_string
index_string ::= <any source character except "]"> +
conversion ::= "r" | "s" | "a"
format_spec ::= <described in the next section>
format_spec ::= [[fill]align][sign][#][0][width][grouping_option][.precision][type]
fill ::= <any character>
align ::= "<" | ">" | "=" | "^"
sign ::= "+" | "-" | " "
width ::= integer
grouping_option ::= "_" | "," # 千位数的分隔符
precision ::= integer
type ::= "b" | "c" | "d" | "e" | "E" | "f" | "F" | "g" | "G" | "n" | "o" | "s" | "x" | "X" | "%"
想要创建一个内嵌变量的字符串,变量被用他的值所表示的字符串替换
s = '{name} has {n} apples' |
vars()
还有一个有意思的特性就是它也适用于对象实例
class Info: |
但是这样还不能很好的处理参数的却是,所以我们还可以定义一个新的dict类
class SafeSub(dict):
def __missing__(self, key):
return '{' + key + '}'
info = Info(name='link')
s.format_map(SafeSub(vars()))
##'link has {n} apples'
import sys
def sub(text):
return text.format_map(safesub(sys._getframe(1).f_locals))
# sub() 函数使用 sys._getframe(1) 返回调用者的栈帧。可以从中访问属性 f_locals
# 来获得局部变量。 毫无疑问绝大部分情况下在代码中去直接操作栈帧应该是不推荐的。
# 但是,对于像字符串替换工具函数而言它是非常有用的。 另外,值得注意的是 f_locals
# 是一个复制调用函数的本地变量的字典。 尽管你可以改变 f_locals 的内容,
# 但是这个修改对于后面的变量访问没有任何影响。 所以,虽说访问一个栈帧看上去很邪恶,
# 但是对它的任何操作不会覆盖和改变调用者本地变量的值。
python 中对于字符串替换有许多其他的解决方案。例如: name = 'Guido'
n = 37
'%(name)s %(n)d messages.' % vars()
import string
s = string.Template('$name has $n messages.')
s.substitute(vars())
但是 format 和 format_map 比这些方法都要先进。所以应该优先使用。而且还可以对齐,填充,格式化等.
你有一些长字符串,想以指定的列宽将它们重新格式化。
使用 textwrap
模块来格式字符串输出,比如
s = "Look into my eyes, look into my eyes, the eyes, the eyes, \
the eyes, not around the eyes, don't look around the eyes, \
look into my eyes, you're under."
import textwrap
textwrap.fill(s, width=20)
# Look into my eyes,
# look into my eyes,
# the eyes, the eyes,
# the eyes, not around
# the eyes, don't look
# around the eyes,
# look into my eyes,
# you're under.
textwrap.fill(s, 40, initial_indent='****')
# ****Look into my eyes, look into my
# eyes, the eyes, the eyes, the eyes, not
# around the eyes, don't look around the
# eyes, look into my eyes, you're under.
textwrap.fill(s, 40, subsequent_indent='****')
# Look into my eyes, look into my eyes,
# ****the eyes, the eyes, the eyes, not
# ****around the eyes, don't look around
# ****the eyes, look into my eyes, you're
# ****under.
textwrap
对于字符串打印非常有用。特别是你想打印输出匹配终端大小的时候.你可以使用os.get_terminal_size()
import os
os.get_terminal_size()
# os.terminal_size(columns=76, lines=32)
你想将HTML或者XML实体如 &entity; 或 &#code; 替换为对应的文本。 再者,你需要转换文本中特定的字符(比如<, >, 或 &)。
如果你想替换文本字符串中的 ‘<’ 或者 ‘>’ ,使用 html.escape()
函数可以很容易的完成。比如: s = 'Elements are written as "<tag>text</tag>".'
from html import escape, unescape
es = escape(s)
# 'Elements are written as "<tag>text</tag>".'
escape(s, quote=False) # 不转化 " 和 '
# 'Elements are written as "<tag>text</tag>".'
unescape(es)
# 'Elements are written as "<tag>text</tag>".'
~/.pypirc [distutils]
index-servers=
pypi
testpypi
[testpypi]
repository: https://test.pypi.org/legacy/
username: your testpypi username
password: your testpypi password
twine upload --repository-url https://test.pypi.org/legacy/ dist/* |
https://setuptools.readthedocs.io/en/latest/setuptools.html#automatic-script-creation >Automatic Script Creation >Packaging and installing scripts can be a bit awkward with the distutils. For one thing, there’s no easy way to have a script’s filename match local conventions on both Windows and POSIX platforms. For another, you often have to create a separate file just for the “main” script, when your actual “main” is a function in a module somewhere. And even in Python 2.4, using the -m option only works for actual .py files that aren’t installed in a package. >setuptools fixes all of these problems by automatically generating scripts for you with the correct extension, and on Windows it will even create an .exe file so that users don’t have to change their PATHEXT settings. The way to use this feature is to define “entry points” in your setup script that indicate what function the generated script should import and run. For example, to create two console scripts called foo and bar, and a GUI script called baz, you might do something like this:
setup( |
Convolutional networks are at the core of most stateof-the-art computer vision solutions for a wide variety of tasks. Since 2014 very deep convolutional networks started to become mainstream, yielding substantial gains in various benchmarks. Although increased model size and computational cost tend to translate to immediate quality gains for most tasks (as long as enough labeled data is provided for training), computational efficiency and low parameter count are still enabling factors for various use cases such as mobile vision and big-data scenarios. Here we are exploring ways to scale up networks in ways that aim at utilizing the added computation as efficiently as possible by suitably factorized convolutions and aggressive regularization. We benchmark our methods on the ILSVRC 2012 classification challenge validation set demonstrate substantial gains over the state of the art: 21.2% top-1 and 5.6% top-5 error for single frame evaluation using a network with a computational cost of 5 billion multiply-adds per inference and with using less than 25 million parameters. With an ensemble of 4 models and multi-crop evaluation, we report 3.5% top-5 error and 17.3% top-1 error
卷积神经网络是目前计算机解决多种多样任务的核心。自从2014年深度的卷积网络成为主流,产生了大量的不同的分支。尽管在大多数任务中增加的模型大小和计算耗费趋于能迅速得到高质量的回报,计算的效率和少量的参数依然能有效作用于很多场景。例如手机和大数据。这里我们探索一种方法能够有效率的计算的放大网络。通过分解卷积模型和积极的正则化。
如图将一个55的卷积转化为2个33的卷积 则参数变为原来的 (33 +
33)/(5*5) = 72% 但是深度却增加了
#引用: * Rethinking the Inception Architecture for Computer Vision https://arxiv.org/pdf/1512.00567.pdf
与当前浏览的网站类似,但也多一些附加功能 1. 登录登出功能 2. 登录后可以编辑博客的功能 3. 浏览博客的功能
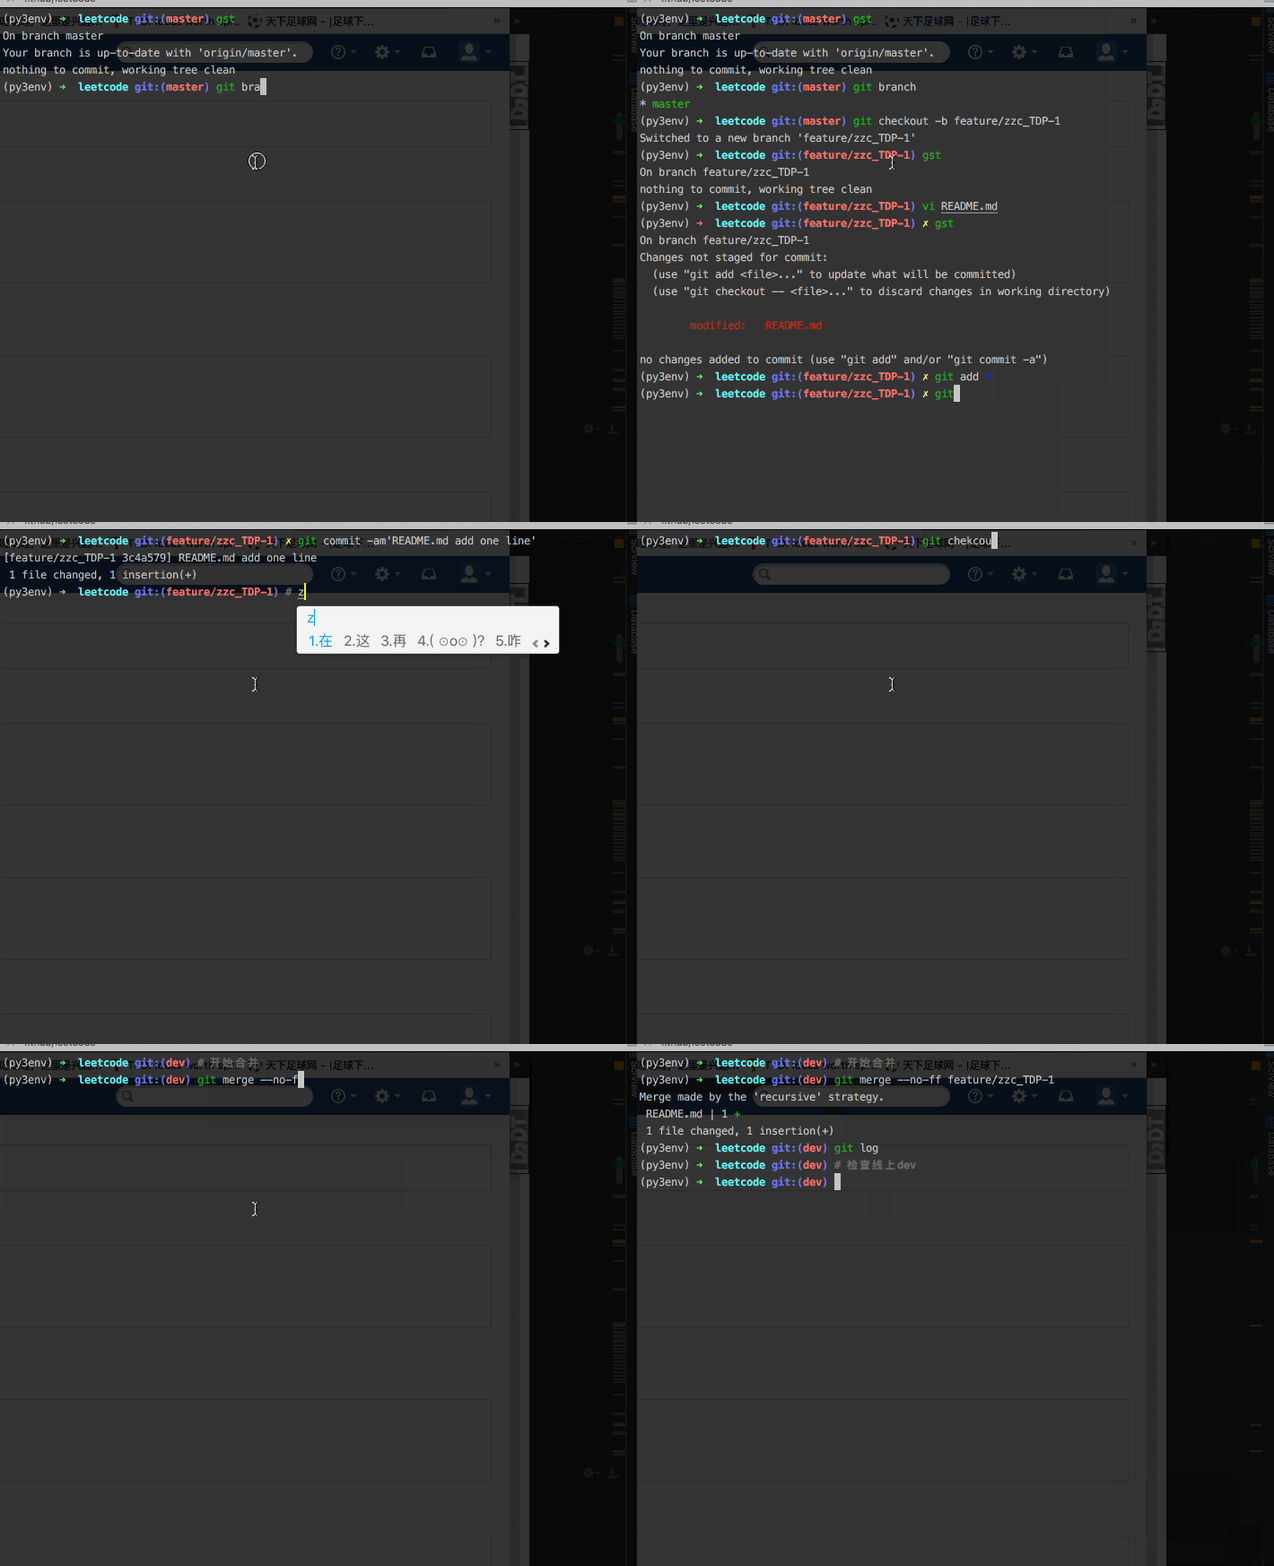
git pull --rebase origin master |
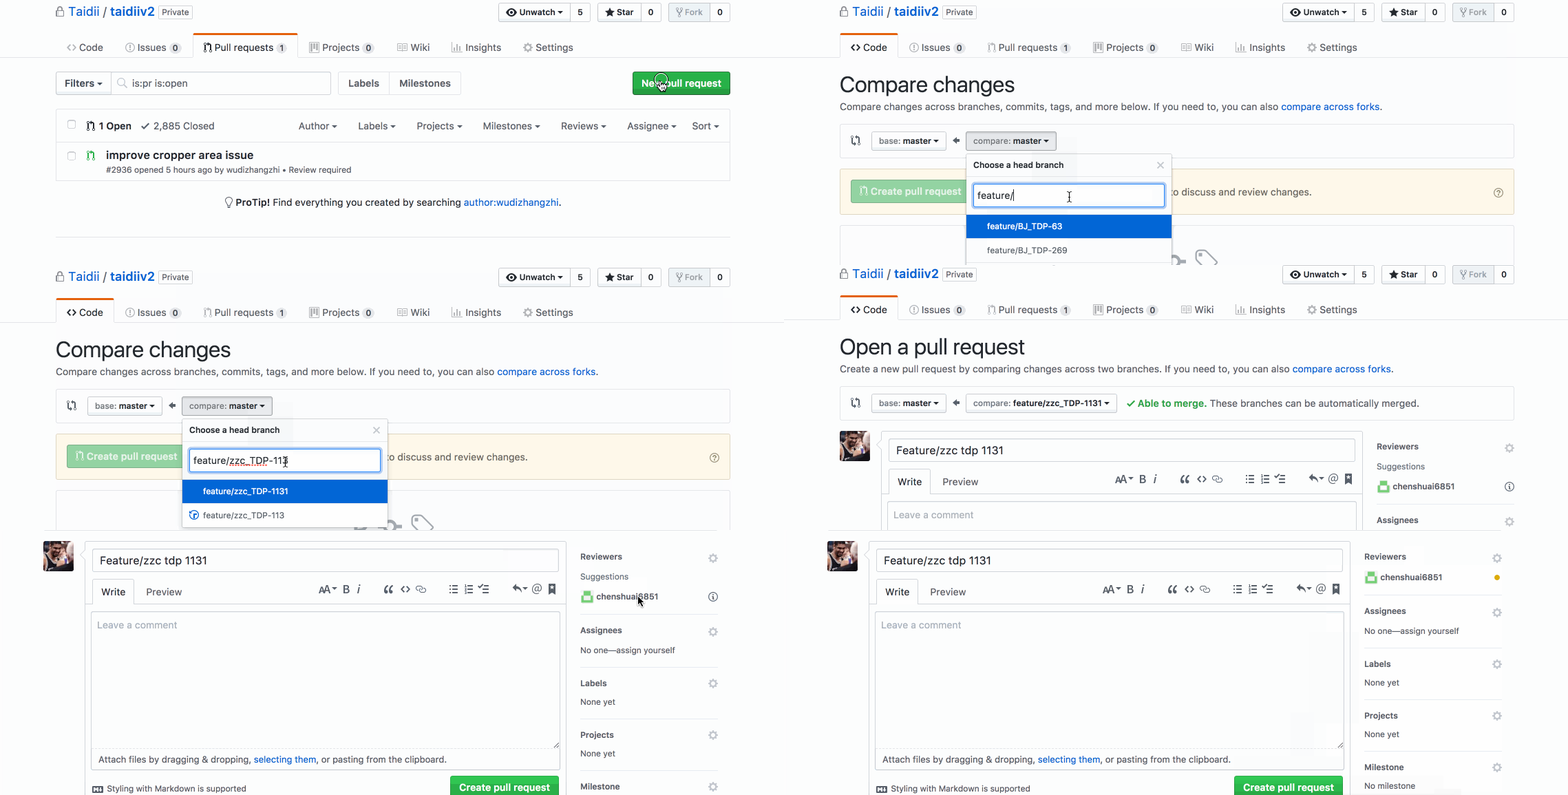
git checkout -b feature/yourname_TDP-xxx |
git checkout feature/yourname_TDP-xxx |
git add * |
git checkout dev |
git push origin dev |
''' |
class Solution(object): |
''' |
class Solution(object): |
''' |
class Solution(object): |
""" |
class Solution(object): |
''' |
''' |
""" |
''' |
''' |
''' |
''' |
''' |
Given a sequence of n integers a1, a2, ..., an, a 132 pattern is a subsequence ai, aj, ak such that i < j < k and ai < ak < aj. Design an algorithm that takes a list of n numbers as input and checks whether there is a 132 pattern in the list. |
参考:http://blog.csdn.net/kuang_liu/article/details/16369475 http://blog.csdn.net/beechina/article/details/51074750
描述样本的中点
描述样本的集中程度,样本集合各个样本点到中点的距离的平均值得平方
各个维度的参数之间的相关性. 正:正相关,负:负相关,0:相对独立
多维度的协方差
计算方法: * 1.各个维度去中心化,即减去各维度的平均值,使各个维度的平均值都为0, 得到矩阵 X * 2. Cov = X * X.T / (m - 1)
用于训练分类的数据库,一共10种分类。 地址:http://www.cs.toronto.edu/~kriz/cifar.html
如图所示,当前使用的结构为
(C + MP) * 2 + F*3
> (C:
convolutional卷积层, MP: maxpooling, F: full connect)
* 与Q-Learning类似。但是第5步中获取 Q现实不同。
Q-learning是查询Q表获取最大的奖励reward
sarsa是将环境代入Q表和算法中获取下一步的行动action_和奖励 Q(observation_, action_)
设计模型: lay_in, lay_hidden, lay_out
initalize each theta(l) to a random value [-e, e]
计算 layer l 上的 a(l)
# 3. back
propagation # 3.1. compute delta
利用一个小规模的模型,来验证代码的正确性
使用梯度下降或者高级方式迭代(如:fmincg), 最小化代价 J(theta)
options = optimset('MaxIter', 50); |
写公式的方法 |
效果